
We tried several options for backing up our WordPress sites. These are the chronicles of some of the options that we decided not to use. For the sake of posterity, we decided to keep these records in case we needed to reconsider these options in the future.
An Option for Incremental Backups Using rsync
Backups have been an important requirement for many decades in the IT world and so there are numerous solutions to this procedure. We investigated two different scripting solutions. The first scripting solution that we investigated utilized the Linux rsync command to make incremental backups. This was based on a YouTube video from Learn Linux TV that creates a backup folder with the name of current that holds a backup of all of the currently active code. Then every day that the backup script runs it uses the built-in capabilities of rsync to create a backup of any of the files that were changed from the previous time that the script was run. This approach has the advantages that there is always a current backup of the code of interest and also that apart from the current copy only the changed files are saved. This avoids having redundant copies of the same code. It should also be possible to compress these files to save space although this was not addressed in the video. Compression would add another level of complexity. This is a very clever solution, but it seems that there could be an issue for certain circumstances if the daily script were to be run multiple times during the same day. It also makes it somewhat complicated to get the exact state of code from a given date, as it would require us to iteratively apply the changes back to that date.
Duplicator Pro for Cloning
Nearly all Content Management Systems are notoriously challenging to migrate in a robust way. This is true for the a simple WordPress installation as well since WordPress stores site information in the database. As a result, many plugins have been created to make it easier to clone a site for a different web server and/or domain. After trying out several different cloning plugins, we chose to use the Duplicator Pro plugin because it made the process relatively straightforward in our experience. Duplicator Pro outputs a zip file with all of the content and code along with a database installation script and an installer PHP file. This output can serve as a backup or for migration of the site. For migration, running the installer PHP file on a website with a new database, new URL, and new domain provides a clone of the original website. This ability also makes it straightforward to create additional clones of the original research web site for development or staging.
In our particular case, we did have some minor issues when cloning the Directories Pro content. We lost the icons that were used for the categories, so we had to manually reset them from the Categories menu item under the My Soil Samples directory that we created.
The Uniqueness of Backup and Cloning Tools for WordPress
This ability to backup and clone a website and its data is one of the most unique features for a WordPress based research website. Although with open source ELNs, it should be possible to back up and clone a website, from what we have seen the maturity and ubiquity of WordPress have helped to make the tools for backup and cloning of websites or ELNs much easier and safer to use than other open source ELNs.
Other Approaches
We tried some other approaches which are worth mentioning. We almost took the approach of using the Bedrock project. The Bedrock project uses composer for dependency management and provides a strong foundation for those wanting to incorporate a DevOps approach to maintenance of their research website. We finally decided against this approach because we decided we would have minimal need for custom development of WordPress plugins.
We also considered other possibilities for providing a staging site. A staging site can be useful for testing new plugins or updates to existing plugins. However, the WP Remote plugin has a feature that will create a staging site (although in our experience this sometimes does not work with certain plugins). The Duplicator Pro plugin for cloning, however, seems to provide this capability in a very robust way and so fulfilled that need.
An Option Using a Deduplicating Archiver with Compression
We have also become aware of the option of using the Borg Backup package that is built using Python. This looks like a more optimized solution with several advantages. We will investigate this for future refinements to our backup approach.
An Option of Using Azure Storage for Backups
There are multiple options for storage in Azure. For our purposes, the best option seemed to be block blob storage. So, we began by signing up for an Azure Blob Storage StorageV2 resource using Locally-redundant storage (LRS) with a flat (non-hierarchical) namespace. It has a default access tier of Cool.
There is an open source package called Blobfuse2 that presents an interface like a virtual file system to the block blob storage. To use Blobfuse2, we first installed the Azure CLI tool on our Ubuntu 22 Linux VM using the one command option. Instructions for installing Blobfuse2 is shown in the Microsoft documentation and from a blogging site from James McDonald. We used the following set of commands to install the Blobfuse2 tool.
wget https://packages.microsoft.com/config/ubuntu/22.04/packages-microsoft-prod.deb
dpkg -i ./packages-microsoft-prod.deb
apt-get update
apt-get install blobfuse2
Through some trial and error, we created the following blobfuse2_config.yaml config file in YAML format.
allow-other: true
logging:
type: base
level: log_debug
file-path: ./blobfuse2.log
components:
- libfuse
- file_cache
- attr_cache
- azstorage
libfuse:
attribute-expiration-sec: 120
entry-expiration-sec: 120
negative-entry-expiration-sec: 240
file_cache:
path: /mnt/resource/blobfuse2tmp
timeout-sec: 120
max-size-mb: 4096
attr_cache:
timeout-sec: 7200
azstorage:
type: block
account-name: mystorageaccount
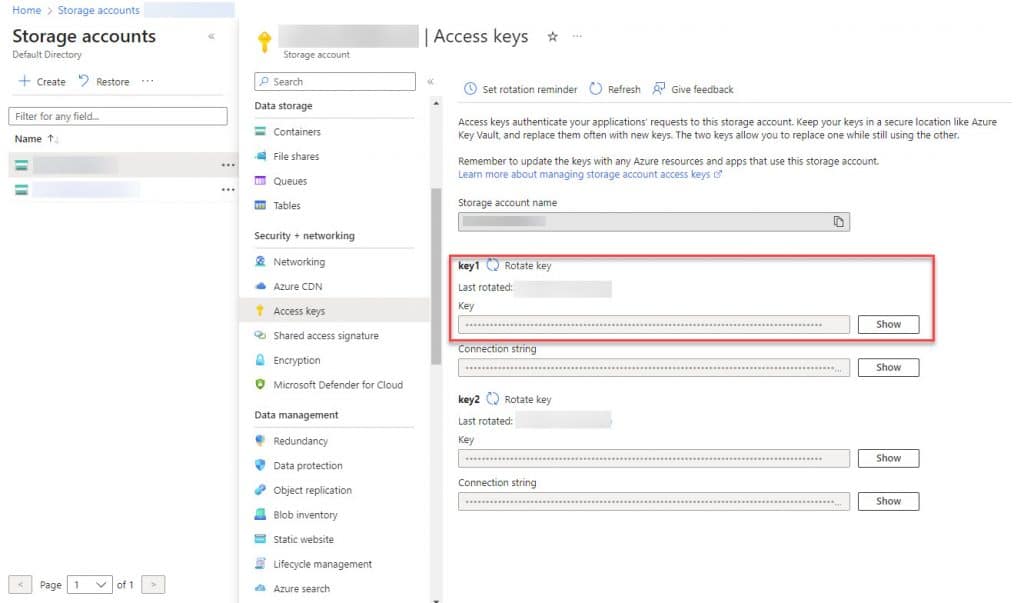
account-key: Value from... Access keys > key1 >> Key (see screenshot below)
endpoint: https://mystorageaccount.blob.core.windows.net
mode: key
container: esrm-backups
blobfuse2_config.yaml file
A screenshot of the Access Keys screen is shown below with the area from where the account-key value was retrieved highlighted in red. Also, the mystorageaccount that is used in the blobfuse2_config.yaml file above corresponds to the grayed-out area as the name of the Storage account in the screenshot below.
Once the Azure CLI and Blobfuse2 were installed and the YAML config file was set up correctly, it was straightforward to mount the Azure storage volume using the following BASH command.
sudo blobfuse2 mount ~/esrm-backups --config-file=blobfuse2_config.yaml
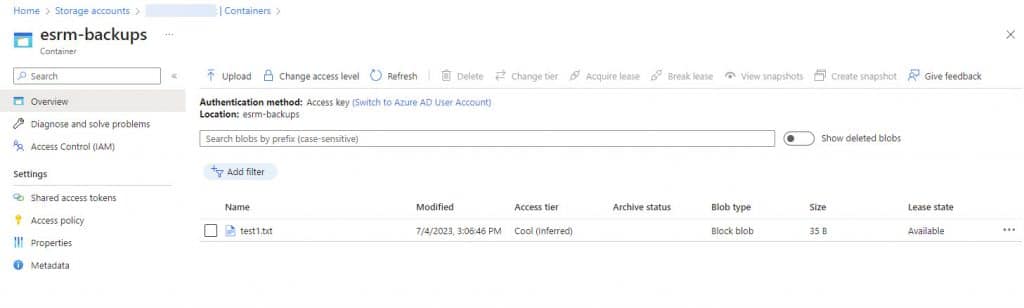
Then I could easily create a test file in the mounted cold storage service using the following sequence.
cd esrm-backups
echo "My Test File" > test1.txt
And then I was able to go to my storage account Containers section in Azure and see the test1.txt file that was just created.
We tried this approach for a few weeks. We found that running Blobfuse 2 in the background seemed to utilize processor capacity on an ongoing basis. This seemed to be a common issue. Rather than trying to debug this approach, we decided to take the simpler approach of backing up to a Digital Ocean Spaces area.